Sunday, November 13, 2011
Removing tabs from a Yamaha XS650...Frame preperations.
It's not perfect, but I'm pretty happy with the results. This was my first attempt at cleaning up a XS650 frame. There are a couple of small gouges left from a cut off wheel. I might end up filling those spots with a small mig welder, then sand those spots smooth with the angle grinder and a 120 grit flap sanding wheel.
Monday, September 19, 2011
Saturday, Frame Paint Stripping...
This frame is going to get hardtailed and powder coated. First I need to get rid of this old paint. Once stripped I'll be spraying down the frame and blowing off the water with the air compressor. Then I plan on checking frame welds and removing some tabs I won't be using. Here is the basic stuff you need for the paint removal process (not pictured 1 small steel brush).
After a couple of hours of multiple coats of paint stripper and scraping here are the results. I ended up using one can of paint stripper, and trashed a paint brush and wire brush. There are a couple of surface rust spots that need to be taken care of. Also I want to get rid of some tabs that I won't be using.
Wednesday, September 14, 2011
Yamaha motorcross wheels
I got these wheels thinking that I might be able to use the front wheels hub for the '78 project I have going. The wheels came off of a Yamaha motorcross bike. They're pretty rough and I'm not expecting to much. Gonna be getting some bearings and stainless steel spokes soon. Also, I'm gonna need an aluminum 21" front rim (36 hole).
Yamaha MX hubs and rims
Taking out the rusty spokes was the easy part. A 4 inch angle grinder and cut off wheel did that job. If I had a torch, maybe it would have been even easier. Removing the tires was the most difficult part. Getting to this point took me a couple of hours of work. About the wheels...The front wheel is 21 inches. The rim is about 2 1/2 wide and had a 3 1/2 tire on. The back wheel is 18 inches. It's about 3 inches wide and had a 4 1/2 tire on it. They still look exactly like this, what the heck is wrong with me? Well, I just need to get back to it. Crazy schedule has been pulling me in lots of different directions lately.
Thursday, September 1, 2011
A little more progress
Here's what I did after work on Wednesday. This stuff was in really rough shape, but the sand blaster was up to the challenge. If your gonna attempt this at home, please, wear a respirator and keep it on till your done. Ventillation is also a good thing too. I had to take a break for a while after this round of parts to let my lungs recover.
Wednesday, August 31, 2011
Dealing with rust
Here is a photo of a home made sand blast cabinet I built this summer. It's basically a re-purpased corner kitchen cabinet that has had it's shelves removed. I added a re-purpased glass door and an exterior light for visibillity. The gun is from Harbor Freight and cost around $20. If you want to build this, it's easy. Just seal it up first before you get blasting. Better yet, put it on rollers and use it outside. The better the ventillation the better.
These 33 year old stock risers looked pretty rough. So in the cabinet they went. This is my first time really using this cabinet on a project. It took around an hour and a half to get the results I got. Next time things should go a little faster though. I've got some changes in mind already that might help speed up the process.
It got a little humid and my blast media stopped feeding through the hopper. I'm still pretty excited to see some results. Getting this rusty stuff cleaned up will save me some cash. These guys will get powdercoated soon (most likely black). I'd like to get a few more parts ready so I can send it all in at one time (or possibly do it myself).
Monday, August 29, 2011
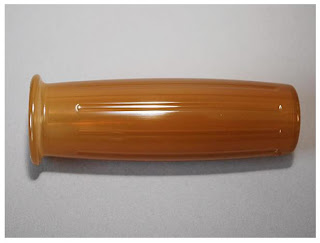
New grips. Like them a lot, but now I'm thinking black might have been better.
I saw these grips at Posh Factory's website a month ago and really liked them. You can check out more of their stuff here...http://www.posh-factory.com/catalogue.htm
I got mine off of Ebay from this guy...http://cgi.ebay.com/ebaymotors/LIGHT-BROWN-Early-Barrel-Grip-7-8-handlebar-/250855101850?pt=Motorcycles_Parts_Accessories&hash=item3a6821159a
They are dam good quality and look even nicer in person. I might still use them. Just have to wait and see how they look as the bike comes togethor.
Friday, August 26, 2011
Special delivery
This beauty (or is it a beast) arrived in the mail yesterday. I couldn't wait to tear into the frame shaped box and see it. This model 1978 Yamaha XS650 started in Japan and found it's way to the hills of Tennessee. It arrived on my front porch in Baltimore, MD with a wasp nest already tucked into the frame (no wasps). This is photo #1 of a project. Who knows about anything, let's just say I hope it will have a rebirth. It's got all my attention, and I'm super stoked to have it. It's hard tailed finally. Looks really nice. Monstercraftsman put on a TC bros tail for me. I shopped around and just found they were the best price going. I'll have to post some photos of it later.
Subscribe to:
Posts (Atom)


